Kubernetes 101 – Part 3: Storage Configuration and Load Balancing
Kubernetes 101 – Part 3: Storage Configuration and Load Balancing
In Part 1, we explored the fundamental building blocks of Kubernetes: CRI, CNI, and CSI. Then in Part 2, we put theory into practice by building our cluster from scratch, setting up our control plane, and joining our worker node.
Alright, so we’ve got our cluster up and running, but there are still a couple of things we need to sort out to make it really useful. In this part, we’re going to tackle two important bits:
-
Storage Configuration: Right now, Longhorn is using the same disk as our operating system, which isn’t great. We’ll fix that by setting up a dedicated disk on each node.
-
Load Balancing: We’ll get MetalLB running so we can access our services (like the Longhorn UI) using real IP addresses on our network, instead of having to mess around with NodePorts or port forwarding.
These might sound like small changes, but they’ll make our homelab cluster much more practical to use and closer to what you’d see in a real production environment.
Why Bother With All This?
You might be wondering why we need to do this extra setup. Let me break it down:
First up, the storage bit. Running everything on the same disk as your operating system works, but it’s not ideal. Think of it like trying to store all your photos, videos, and documents on the same small SSD as your operating system. Sure, it works, but it’s much better to have a separate drive for all that data. Same principle here - we want our container storage separate from the system disk.
As for the load balancing part, if you’ve tried accessing your Kubernetes services from outside the cluster before, you probably had to use NodePorts or do some port forwarding magic. MetalLB fixes this by giving our services real IP addresses that we can access directly from our network. Much cleaner!
Right, let’s get our hands dirty and set this up!
Preparing Storage for Longhorn
First, we’ll set up the dedicated storage for Longhorn on each node. You’ll need to perform these steps on both the control plane and worker nodes.
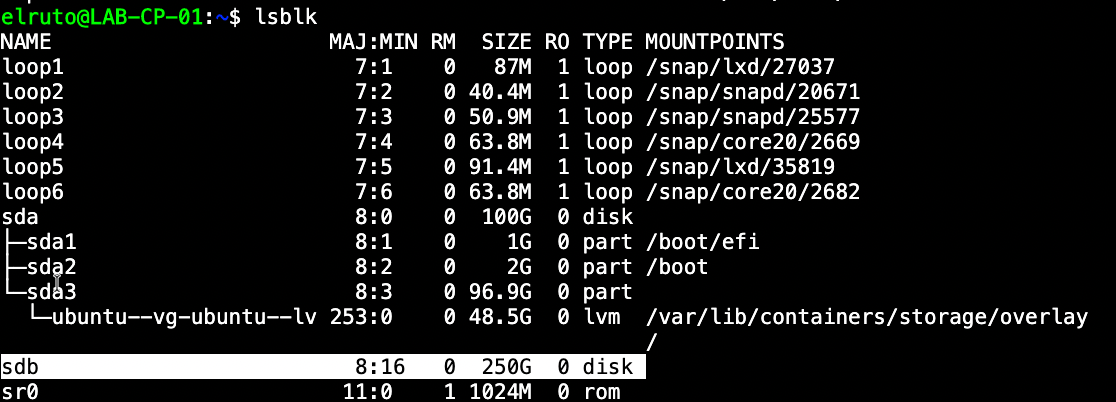
I won’t go through the process of actually adding the disk, as I’m assuming you have already added a secondary disk to your VM. In my case, the disk displayed as /dev/sdb, but make sure to check yours.
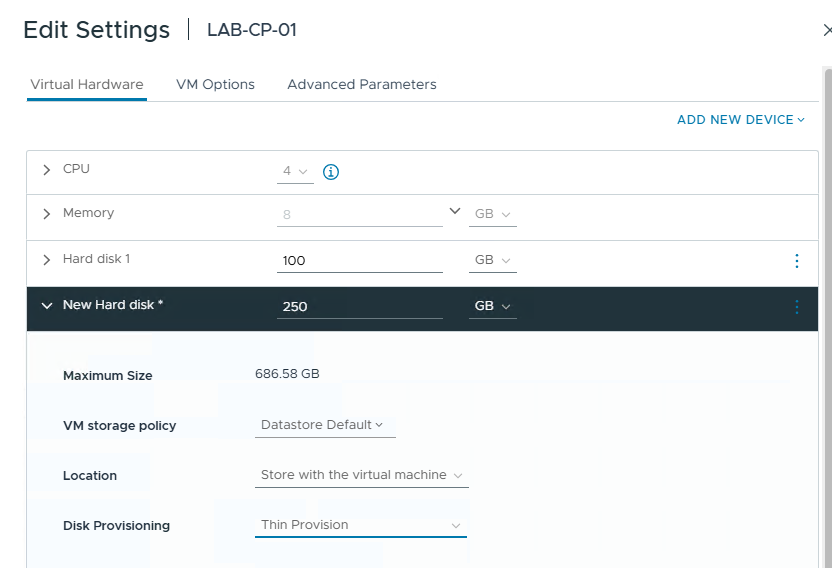
Just to show this, I’ve added a 250GB disk within vCenter (This was done on both the control plane and the worker node):
Adding and Formatting the Disk - DO ON ALL NODES
- First, let’s identify our new disk:
lsblk
- Format the disk (replace
sdXwith your actual disk, e.g.,sdb):
sudo mkfs.ext4 /dev/sdX
- Create the mount point:
sudo mkdir -p /mnt/longhorn
- Get the disk’s UUID:
sudo blkid /dev/sdX
- Add to fstab for persistent mounting:
echo "UUID=<your-uuid> /mnt/longhorn ext4 defaults 0 0" | sudo tee -a /etc/fstab
- Mount the disk:
sudo mount -a
- Verify the mount:
df -h /mnt/longhorn
When you have completed these steps you should see the disk show up as below

Note: Replace
sdXwith your actual disk name. Be extremely careful with disk operations—double-check the device name to avoid formatting the wrong disk!
Installing and Configuring MetalLB
Now that our storage is ready, let’s set up MetalLB to provide proper load balancing capabilities. MetalLB will allow us to create Kubernetes LoadBalancer services that have real IP addresses on our network.
Installing MetalLB
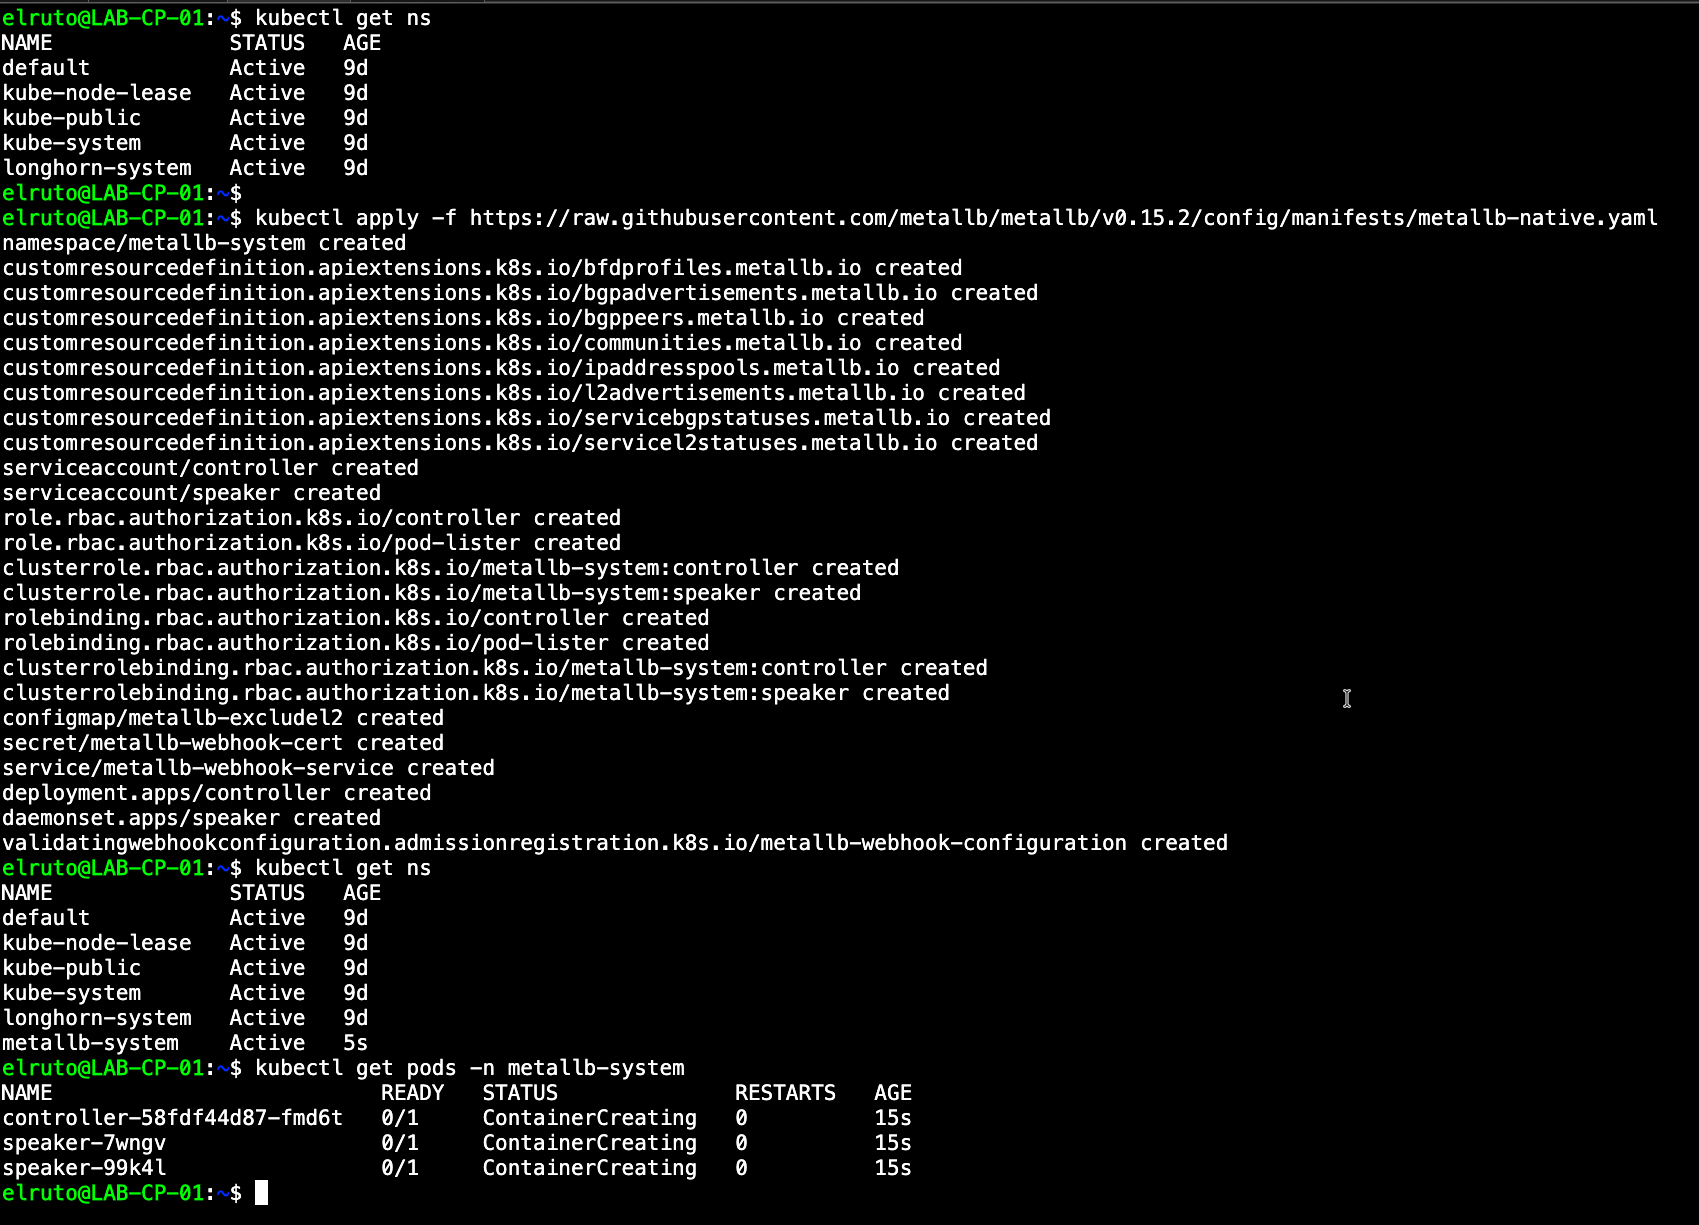
- Install MetalLB using manifest:
kubectl apply -f https://raw.githubusercontent.com/metallb/metallb/v0.15.2/config/manifests/metallb-native.yaml
- Wait for MetalLB pods to be ready:
kubectl wait --namespace metallb-system \
                --for=condition=ready pod \
                --selector=app=metallb \
                --timeout=90s
Configuring MetalLB’s IP Address Pool
Create an IP address pool for MetalLB to use:
Here’s where we tell MetalLB which IP addresses it can use. I’m keeping it simple in my lab with just Layer 2 mode since I’m not doing anything fancy with BGP. You’ll want to adjust these IPs based on your network setup. Here’s what we need to apply:
cat << EOF | kubectl apply -f -
apiVersion: metallb.io/v1beta1
kind: IPAddressPool
metadata:
    name: first-pool
    namespace: metallb-system
spec:
    addresses:
    - <YOUR_IP_RANGE>  # e.g., 192.168.1.240-192.168.1.250
---
apiVersion: metallb.io/v1beta1
kind: L2Advertisement
metadata:
    name: l2-advert
    namespace: metallb-system
spec:
    ipAddressPools:
    - first-pool
EOF
Note: Replace
<YOUR_IP_RANGE>with a range of unused IP addresses in your network. Make sure these IPs are outside your DHCP server’s range!
Fantastic, now that we have completed that and its all been successfull we can expose the longhorn UI externally which means we can access it outside of the cluster which we need to do to add the storage we created earlier.
Configuring Longhorn Storage
Now that we have our dedicated storage and load balancing set up, let’s configure Longhorn to use our new disks and expose its UI.
Updating Longhorn Storage Path
- Check that Longhorn is running:
kubectl get svc longhorn-frontend -n longhorn-system
Exposing the Longhorn UI
Create a LoadBalancer service for the Longhorn UI:
Edit the existing service to type LoadBalancer:
kubectl patch service longhorn-frontend -n longhorn-system -p '{"spec": {"type": "LoadBalancer"}}'
Check the assigned IP:
kubectl get svc -n longhorn-system longhorn-frontend-lb
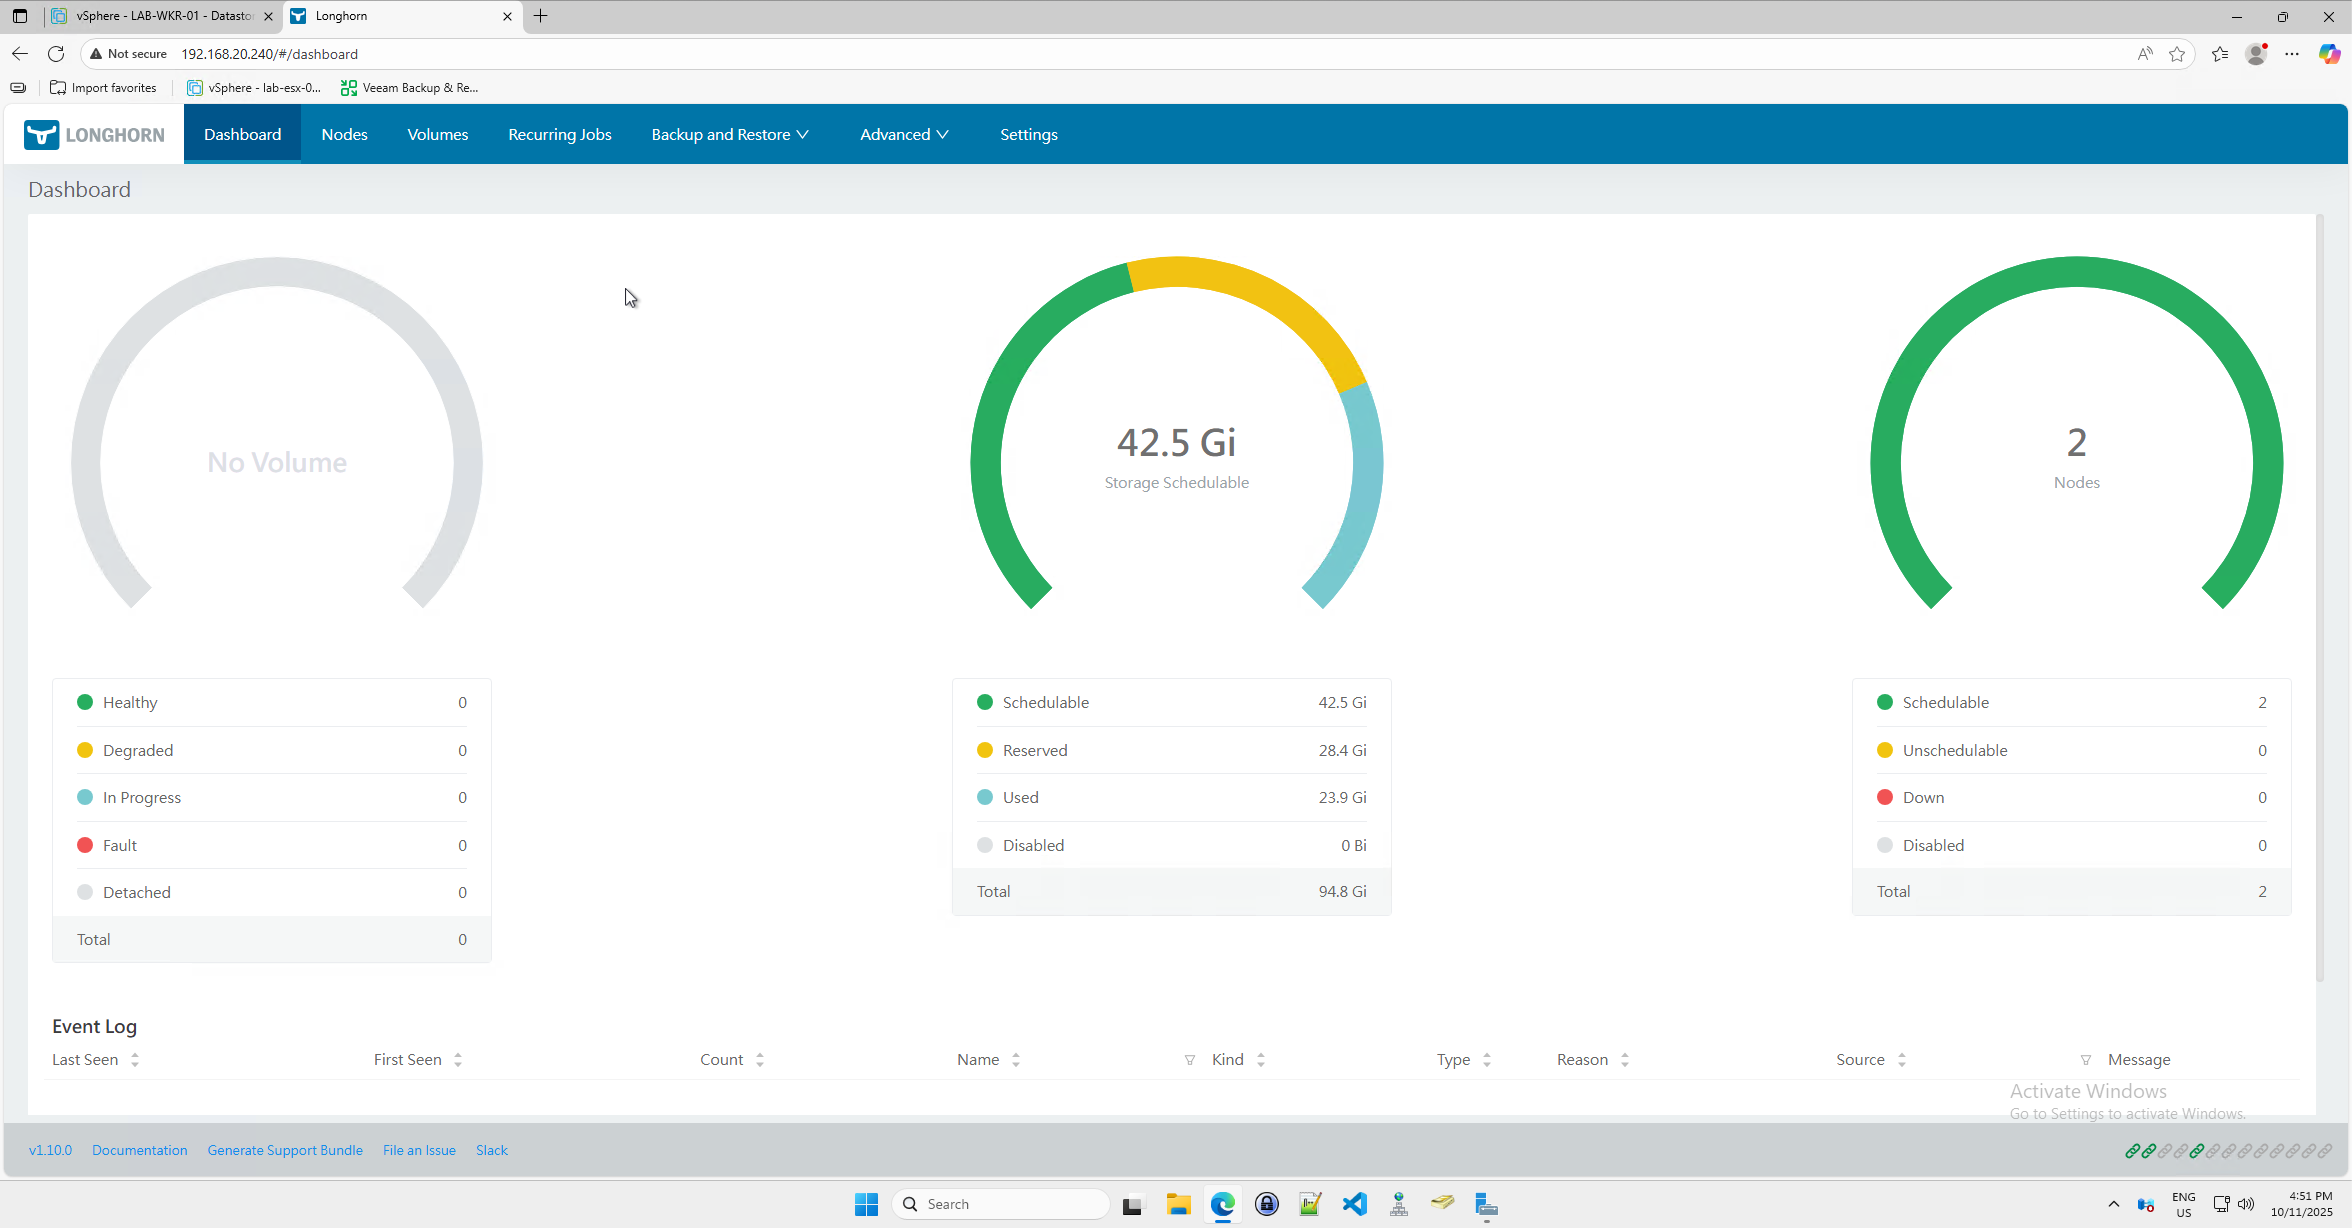
Now that we have done that we can see that the Longhorn-frontend now has an extner IP assigned to it which can be used for external communication.

You should now be able to access the Longhorn UI at http://<ASSIGNED_IP> in your browser:
Adding Additional Disks in Longhorn UI - DO ON ALL NODES
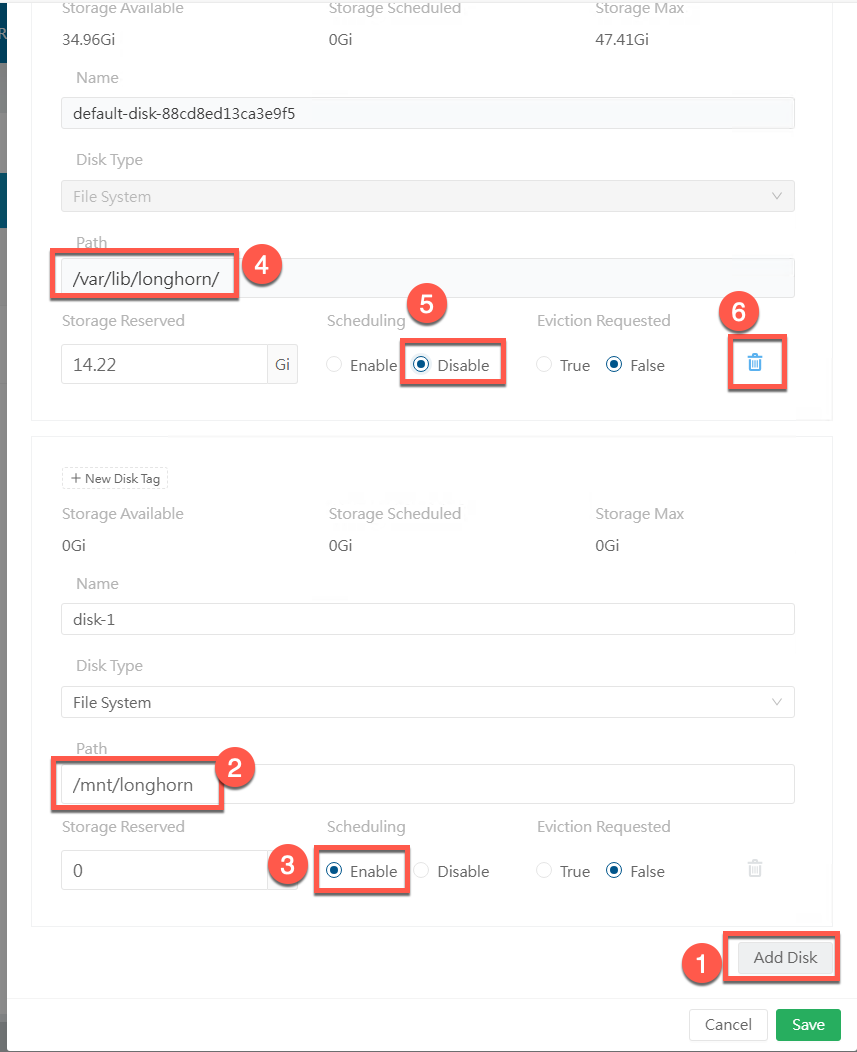
Navigate to the node tab and select the first node and edit the node configuration.

Click on Add Disk, add the new disk path /mnt/longhorn that we created earlier and mark the disk as schedulable. Once we have done we need to remove the default disk which is at /var/lib/longhorn by setting it as unscheduable and deleting it
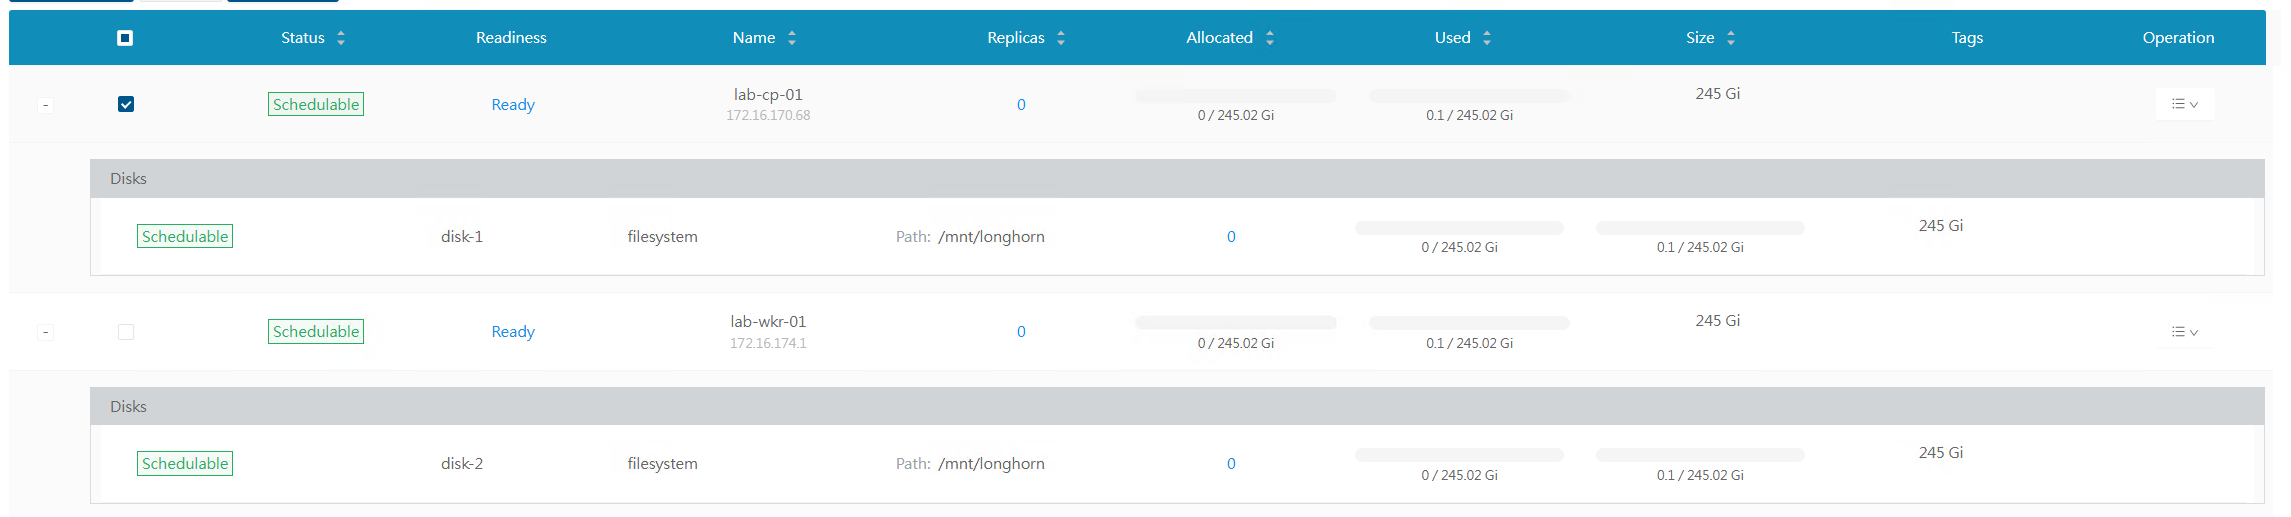
Once all the configuration is done, save it and repeat this process for all nodes in your cluster. Finally, we can confirm it’s all completed on all nodes. As we can see in my cluster, there’s now a 250GB disk available for each node:
Creating the snaphot class
Before we can actually take snapshots of our persistent volumes, we need to set up the snapshot controller and the necessary CRDs (Custom Resource Definitions) in our cluster. The commands above do just that.
First, we grab the external-snapshotter repo, which contains all the manifests we need. Then we install the CRDs so Kubernetes knows what a VolumeSnapshot is. After that, we deploy the snapshot controller itself—this is the bit that actually handles snapshot operations behind the scenes.
Finally, we create a default VolumeSnapshotClass for Longhorn. This tells Kubernetes how to talk to Longhorn when it needs to create or delete a snapshot. Once this is done, you’ll be able to take snapshots of your volumes and use them for backups, restores, or just peace of mind.
# Clone the Repo
git clone https://github.com/kubernetes-csi/external-snapshotter
cd external-snapshotter

#Install the Snapshot CRDs
kubectl create -k client/config/crd

#Install the Common Snapshot Controller:
kubectl create -k deploy/kubernetes/snapshot-controller

#Add Default volumesnapshotcontroller
cat <<EOF | kubectl apply -f -
apiVersion: snapshot.storage.k8s.io/v1
kind: VolumeSnapshotClass
metadata:
  name: longhorn
  annotations:
    k10.kasten.io/is-snapshot-class: "true"
driver: driver.longhorn.io
deletionPolicy: Delete
parameters:
  type: snap
EOF
Wrapping Up
And there we have it! We’ve taken our basic Kubernetes cluster and made it much more practical by:
- Moving our storage to dedicated disks (your data will thank you later)
- Setting up proper load balancing so we can actually access our services
- Getting Longhorn configured the right way with its own storage space
- Adding Snapshot capabilities
- Making sure everything is working as expected
What’s Coming Up Next
Now that we’ve got all the infrastructure bits sorted out, we can start having some real fun. In the next part, we’ll deploy some actual applications and get into the good stuff, setting up proper backup strategies with Kasten K10.
Thanks for sticking with me through all this setup. I know it can be a bit tedious, but having a solid foundation will make everything else we do much easier. See you in the next part!