Kubernetes 101 – Part 2: Building Your First Kubernetes Cluster
Kubernetes 101 – Part 2: Building Your First Kubernetes Cluster
Disclaimer:
I’m not a professional developer. This guide is intended to demonstrate the “art of the possible” rather than serve as production-ready code. Use this example with caution, and always test thoroughly in your environment before relying on it for critical tasks. k8s_Build
In Part 1 we looked at the foundational building blocks of Kubernetes which is the CRI, CNI, and CSI and why they matter when it comes to running and protecting workloads with Kasten K10.
Now that all the boring theory is out of the way, let’s get stuck into the lab and actually deploy this.
To keep things super simple, I’m only going to use two Ubuntu VMs on the same subnet: one as the control plane and the other as a worker node. The reason for this is simple—I want to make this as accessible as possible by keeping the resource requirements low. Not everyone runs a cloud in their garage (you know who you are 😉)
I know many people will say to just use K3s or Minikube for a test cluster—it’s simple and will create the cluster for you, which I agree with, but the idea here is to do it the hard way so we actually learn something.
Pre-Reqs
To kick things off, we will need two VMs running Ubuntu 22.04.5 LTS, each with at least 2 vCPUs and 4 GB RAM.
Each VM should have two disks: one for the OS and one that will be used by Longhorn as our data disk.
You will also need basic SSH knowledge and an internet connection. That’s pretty much it.
+---------------------------------------------------+
| Name       | Function      |       IP             |
+---------------------------------------------------+
| LAB-CP-01  | Control Plane | <CONTROL_PLANE_IP>   |
| LAB-WKR-01 | Worker Node   | <WORKER_NODE_IP>     |
+---------------------------------------------------+
Note: Replace
<CONTROL_PLANE_IP>and<WORKER_NODE_IP>with the actual IPs of your nodes in your network. For example, if your network is 192.168.1.0/24, you might use 192.168.1.10 and 192.168.1.11.
I’m not going to go through the process of deploying the VMs as im sure there are a hundred different guides already on how to do that so I’ll make the assumption we have that ready to rock and roll and move on.
If you take a read of the Kubernetes documentation you will see that most of the steps we follow here, at least for the Kubernetes install, have been taken straight out the documentation. I will agree the docs can be a bit confusing which is why I’ve done this to simplify it as much as I possibly can but mileage may vary and as always don’t run commands off random blogs without knowing what they do.
Install Time
So we will be deploying:
- Kubernetes Version 1.33 using Kubeadm
- Calico Version 1.33
- CRIO Version 1.33
The full script is provided in the Git Repo if you want to just copy the entire script out instead rather than running each line individually to do that we can basically just clone the repo and run the script with sudo permissions (Step 1 - 4)
Step 1 – Install the Basics - DO ON ALL NODES
First up we need to install some common tools and also quickly update Ubuntu to the latest and greatest
#Install common requirements
apt-get -y update
apt-get -y upgrade
apt-get install -y software-properties-common curl gpg apt-transport-https
Step 2 – Disable Swap - DO ON ALL NODES
Step 2 requires us to disable the swap memory and enable IPV4 filtering KubeDocs
#make some changes
sudo swapoff -a
modprobe br_netfilter
sysctl -w net.ipv4.ip_forward=1
Step 3 – Add the Required Repos - DO ON ALL NODES
KUBERNETES_VERSION=v1.33
CRIO_VERSION=v1.33
CALICO_VERSION=v3.30.3
##Kubernetes Repo
curl -fsSL https://pkgs.k8s.io/core:/stable:/$KUBERNETES_VERSION/deb/Release.key |  gpg --dearmor -o /etc/apt/keyrings/kubernetes-apt-keyring.gpg

echo "deb [signed-by=/etc/apt/keyrings/kubernetes-apt-keyring.gpg] https://pkgs.k8s.io/core:/stable:/$KUBERNETES_VERSION/deb/ /" | tee /etc/apt/sources.list.d/kubernetes.list

##CRIO Repo
curl -fsSL https://download.opensuse.org/repositories/isv:/cri-o:/stable:/$CRIO_VERSION/deb/Release.key | gpg --dearmor -o /etc/apt/keyrings/cri-o-apt-keyring.gpg

echo "deb [signed-by=/etc/apt/keyrings/cri-o-apt-keyring.gpg] https://download.opensuse.org/repositories/isv:/cri-o:/stable:/$CRIO_VERSION/deb/ /" | tee /etc/apt/sources.list.d/cri-o.list

## Helm Repo
curl -fsSL https://packages.buildkite.com/helm-linux/helm-debian/gpgkey | gpg --dearmor | sudo tee /usr/share/keyrings/helm.gpg > /dev/null
echo "deb [signed-by=/usr/share/keyrings/helm.gpg] https://packages.buildkite.com/helm-linux/helm-debian/any/ any main" | sudo tee /etc/apt/sources.list.d/helm-stable-debian.list
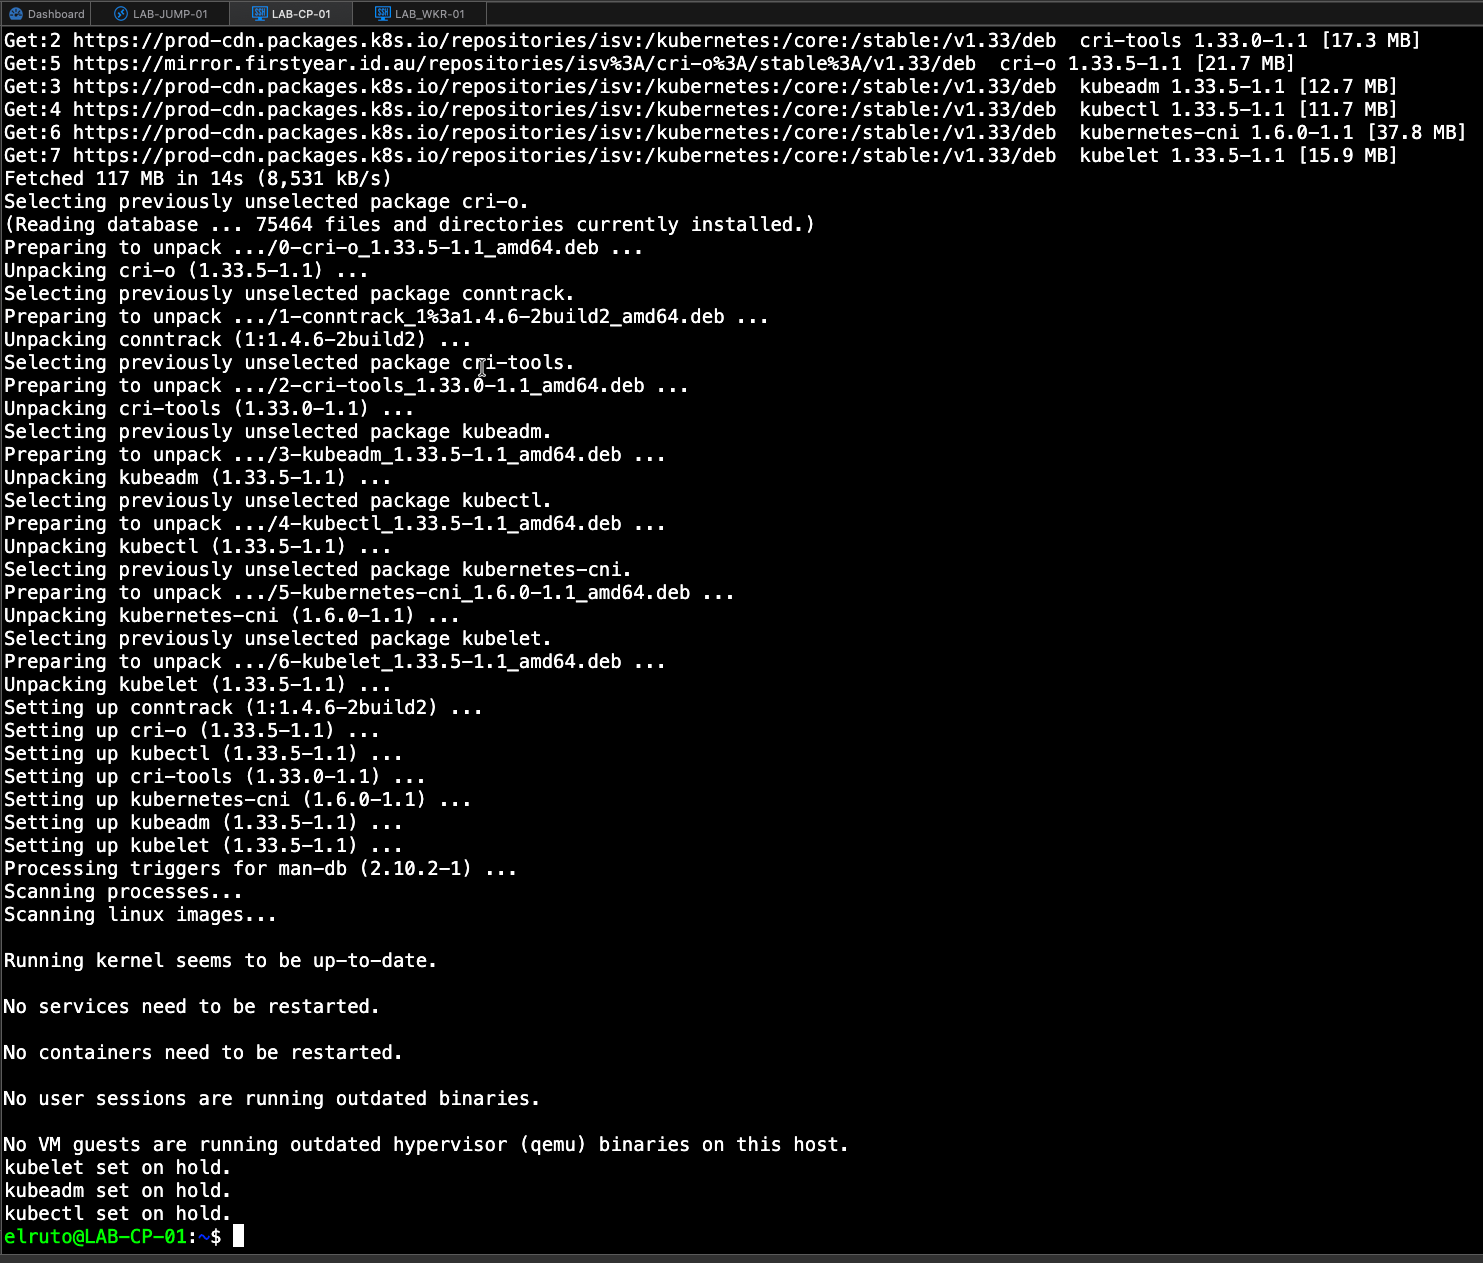
Step 4 – Install all packages - DO ON ALL NODES
sudo apt-get update
sudo apt-get install helm

#Install Kubernetes
apt-get update
apt-get install -y cri-o kubelet kubeadm kubectl
apt-mark hold kubelet kubeadm kubectl #Version 1.33

#Start CRI-O
systemctl start crio.service
If everything went according to plan, you should be left with the kubernetes packages being set to “hold” which hopefully means everything deployed successfully.
Step 5 - Initiate the Cluster - ONLY ON CONTROL PLANE
Once we have installed all the pre-reqs as above on all our nodes, we need to initalize the cluster which luckily is super simple thanks to Kubeadm tool.
sudo kubeadm init
This will kick off the process, it will download all the required images and when its finished it will provide you with a join token, this is important as we will need that to join our worker node to the cluster
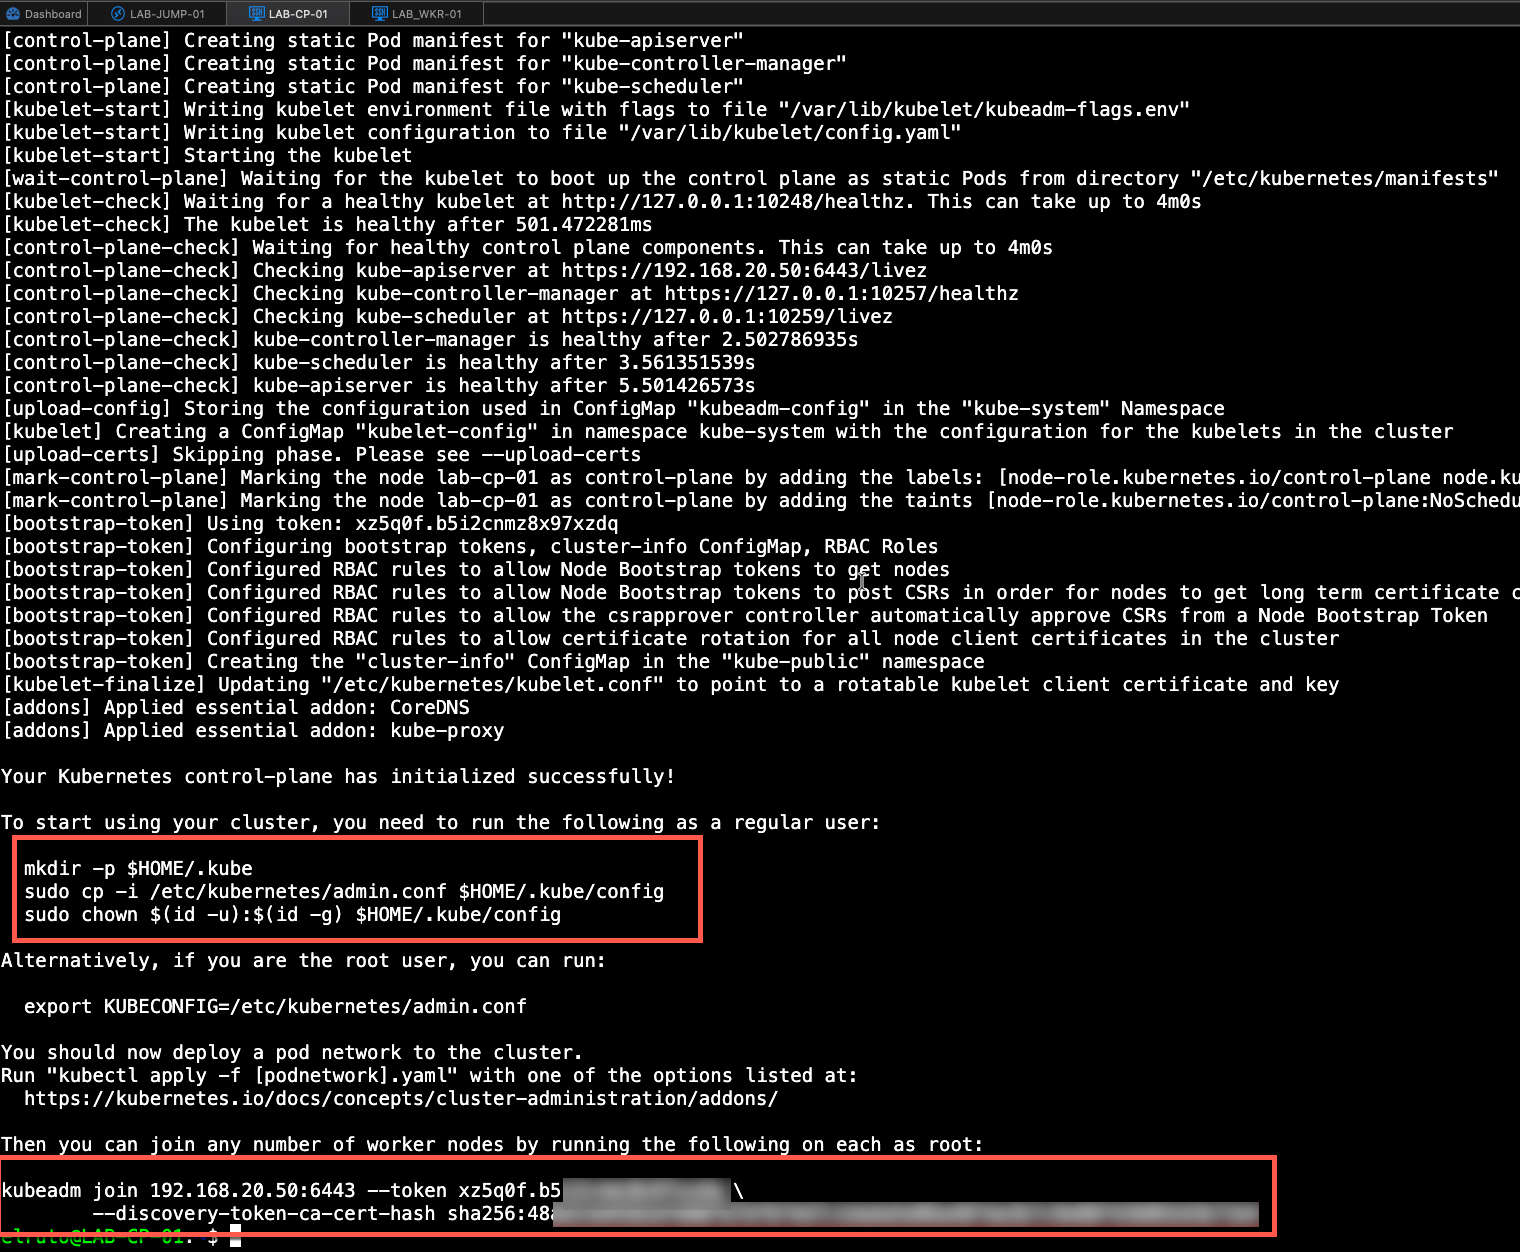
As you can see from the image, we need a couple of commands that will allow our normal user to connect to our Kubernetes cluster. The init process provides these commands, but I’ve improved them slightly to include bash auto-completion and create an alias so that I don’t have to type out kubectl each time.
Also, take a copy of the join token so we can use it to join our worker to the cluster. Don’t worry if you lose it, as it can be regenerated.
mkdir -p $HOME/.kube
sudo cp -i /etc/kubernetes/admin.conf $HOME/.kube/config
sudo chown $(id -u):$(id -g) $HOME/.kube/config
source <(kubectl completion bash)
echo "source <(kubectl completion bash)" >> ~/.bashrc
alias k=kubectl
complete -F __start_kubectl k
Step 5 - Untaint the Control Plane - ONLY ON CONTROL PLANE
Because this is a lab environment and we are running light on resources, we can do something called untainting which basically means we can run pods on the control plane. By default, the control plane doesn’t allow workloads to be scheduled, but because this is a lab, we can simply untaint it which will allow us to run workloads on this node and use the resources available.
kubectl taint nodes <node-name> node-role.kubernetes.io/control-plane:NoSchedule-

Step 6 - Install Calico - ONLY ON CONTROL PLANE
Next up we need to deploy our CNI. At this point we have our CRI deployed and Kubernetes installed but no network. If we were to run kubectl get nodes we would see that the control plane is sitting in a “Not Ready” state. This is because it’s still missing core components it needs to work, which is where the CNI comes in.

As mention we are using Calico which makes it super simple to deploy with only two commands.
##
curl https://raw.githubusercontent.com/projectcalico/calico/v3.31.0/manifests/calico.yaml -O
kubectl apply -f calico.yaml
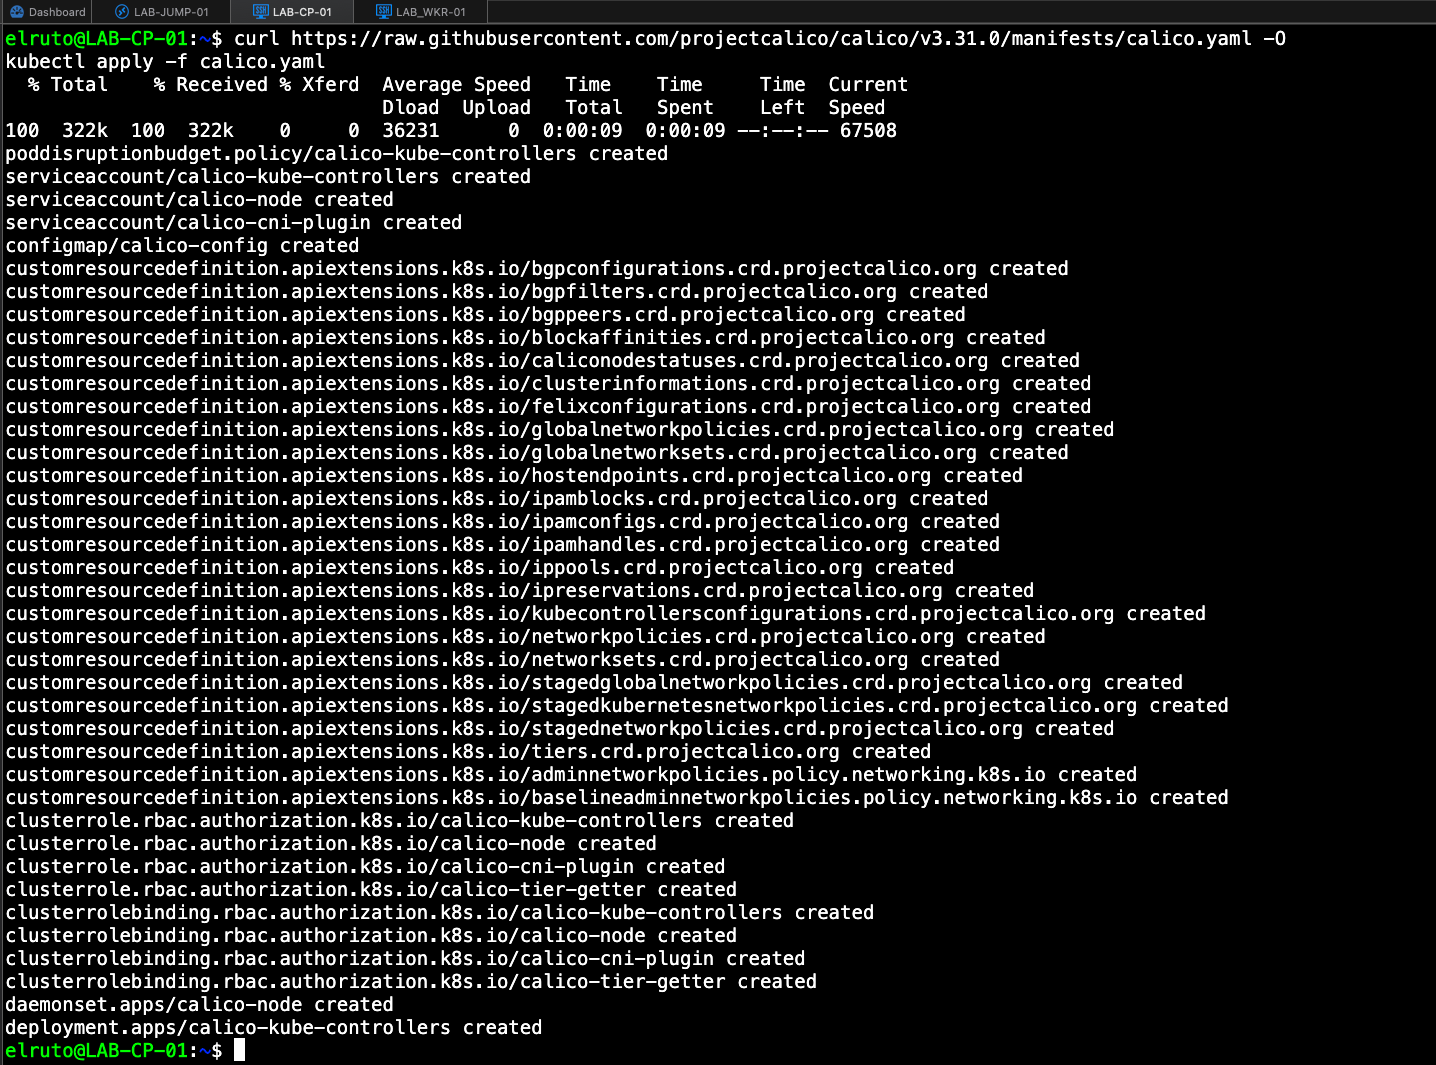
Now we check our nodes again we should see that our control plane is a “Ready” State.
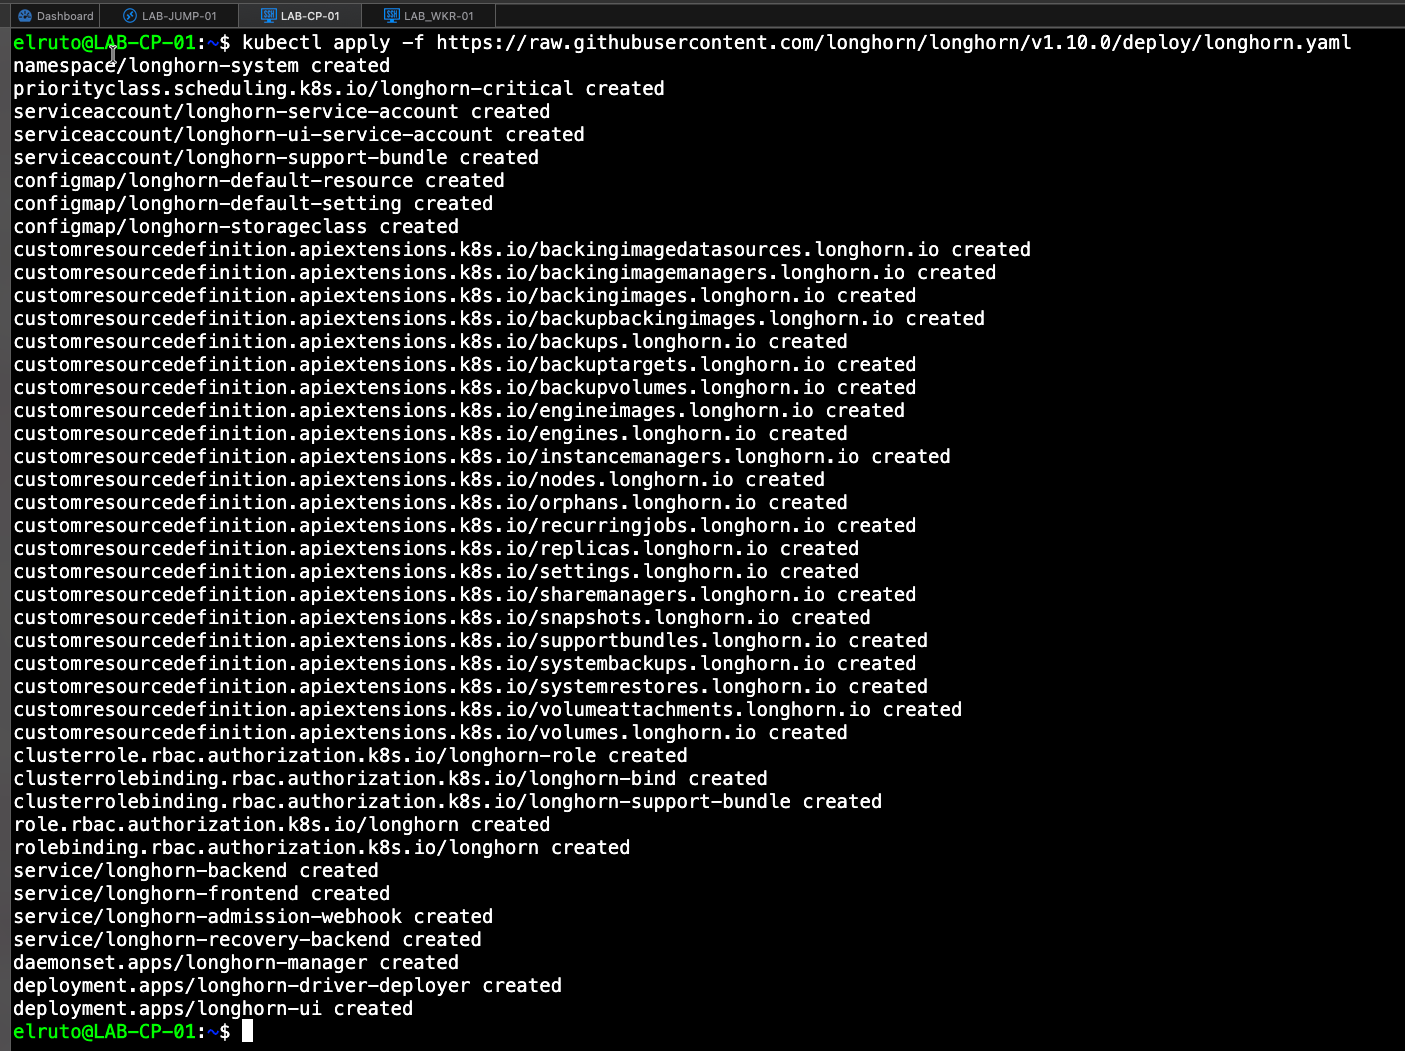
Step 7 - Install Longhorn - ONLY ON CONTROL PLANE
Now we need to install our CSI which in this case will be Longhorn, in part 3 we will cover how to attach additional disks to Longhorn but for now we just need to get it installed and running in the cluster and we can do that by running the below command.
This will create the longhorn namespace and all the required resources to run our software defined storage.
kubectl apply -f https://raw.githubusercontent.com/longhorn/longhorn/v1.10.0/deploy/longhorn.yaml
Step 8 - Join the Worker Node - ONLY ON THE WORKER
We need to join the worker to the cluster and we can do this by running the join command we took from the control plane, once we run the below command it will go and download the images it needs, join the cluster
sudo kubeadm join <CONTROL_PLANE_IP>:6443 --token <YOUR_TOKEN> \
        --discovery-token-ca-cert-hash sha256:<YOUR_HASH>
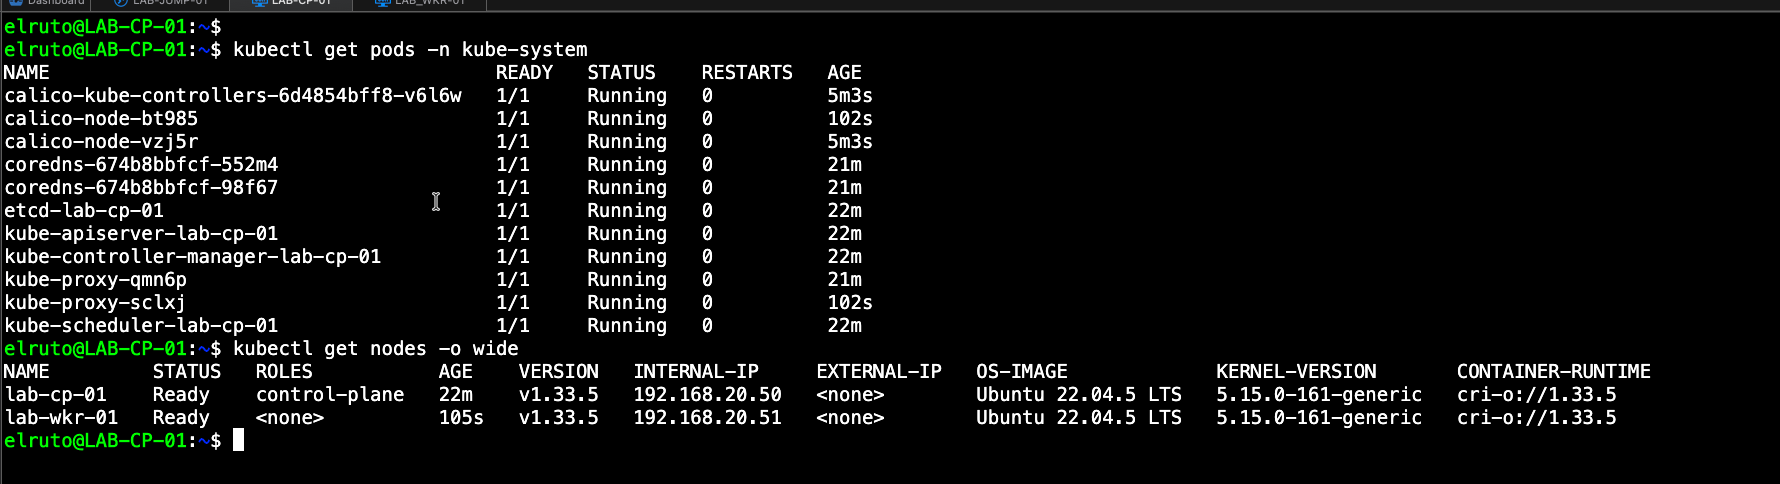
Once this is done we should see our worker node in a ready state on the control plane and if you are paying attention you’ll also notice that there is now an additional calico node pod thats been spun up
What’s Next
Phew! What a journey, but we’ve accomplished something significant, a fully functional Kubernetes cluster built from the ground up with our own hands. This hands-on experience is invaluable for understanding how the different components work together.
In Part 3, we’ll enhance our cluster by:
- Setting up a snapshot controller for better storage management
- Configuring an additional disk for Longhorn to separate storage from the OS drive
- Fine-tuning our cluster for better performance
Thanks for reading — I hope you found this guide helpful. As always, stay curious and keep learning!