The Kubernetes Journey – Using VMware as your CSI
// Table of Contents
In my initial setup I opt’d to use use NFS as my CSI as the lab I was using to play around was still vSphere 6.7u2 which did not meet the minimum requirements for Cloud Native storage. So I decided to spend some time over the weekend and upgrade it to 7.0u2 which was recently been released.
As always I’m sure this blog series will contain some errors/issues as I am learning as I go so please feel free to reach out to me and lets chat, we are all learning together!
Overview
So the goal for today was to leverage Cloud Native block storage within vSphere as this is now a native capability of the product. In order to do that we need to deploy the vSphere Cloud Provider Interface (CPI) and the vSphere Container Storage Interface Driver as well as a few other things, so lets review the steps below and then walk through the process.
- Create vSphere Roles and Privileges.
- Create a VM Storage Policy
- Install and configure the vSphere Cloud Provider Interface (CPI).
- Install vSphere CSI Driver.
- Create a new storage class for dynamic provisioning.
- Create a persistent volume that is visible in vSphere.
Create vSphere Roles and Privileges
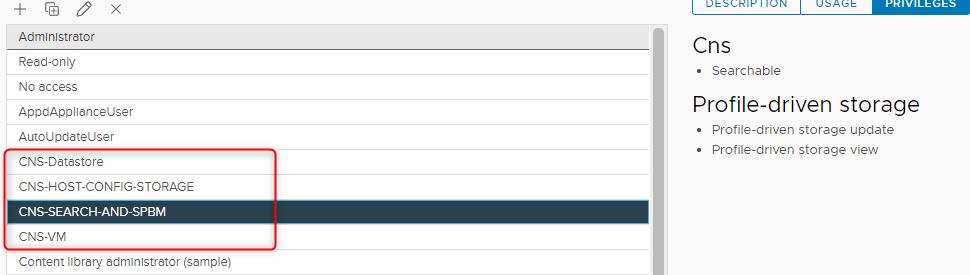
Because this is my lab environment and im lazy, I chose to just use my admin account but in the real world I would ensure that we use the least amount of privileges, so to adhere to that we would want to limit the scope of what the CNS account can do. We can accomplish this by following the (once again) awesome documentation that outlines the permissions required. When you are done you should see 4 additional roles as below.
Create a VM Storage Policy
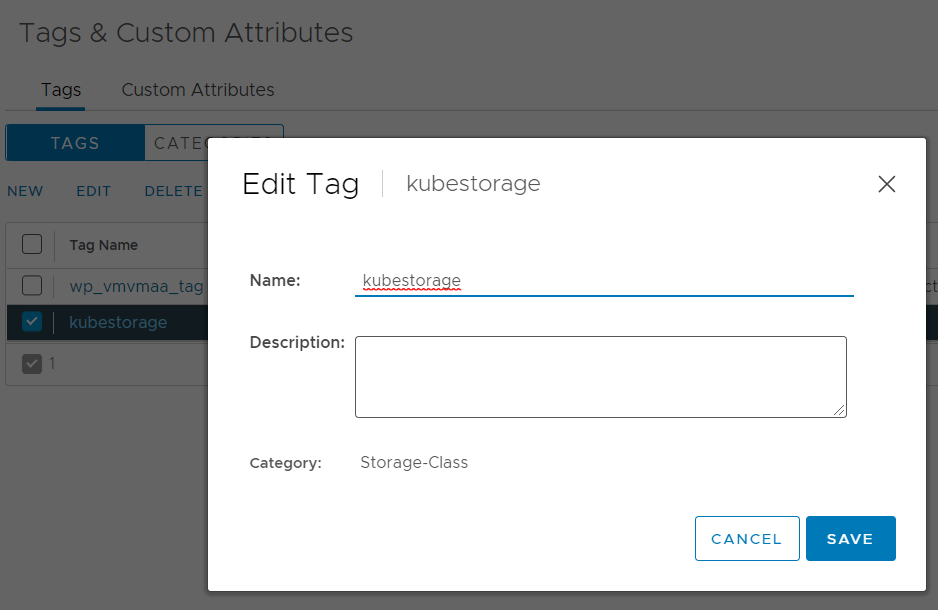
Next up we need to create our VM storage Policy, This is required so when we create the CSI later on it knows which datastores it’s allowed using for Kubernetes. To accomplish this I chose to use tags to identify the datastores as my datastore is a NFS datastore coming off my home synology NAS. We do this by navigating to Tags & Custom attributes and create a new category called “Storage-Class” and a new tag called ‘KubeStorage”. When you are done it should look like this.
-
Navigate to your datastore and apply the tag you just created.
-
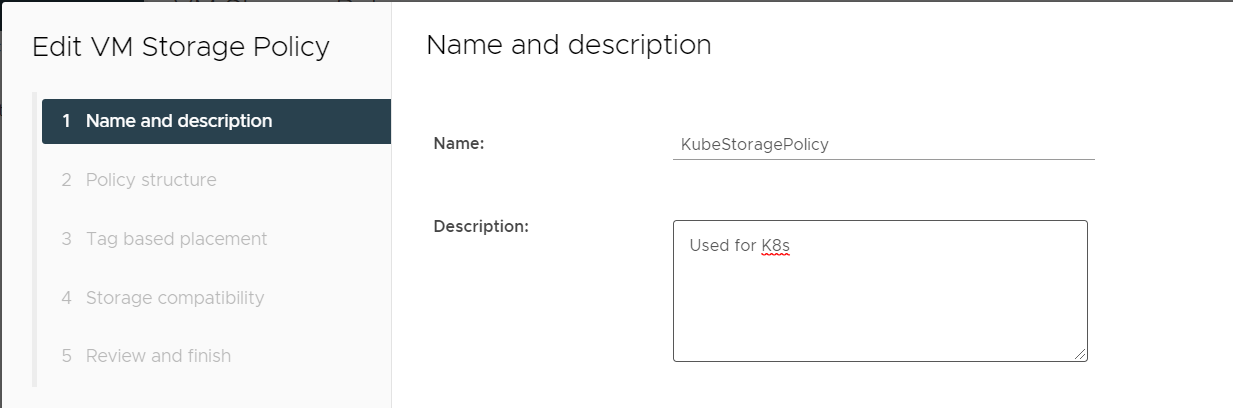
Navigate to VM Storage Policies and click create.
- Provide a Name and Description.
- Tick “Enable tag based placement rule”.
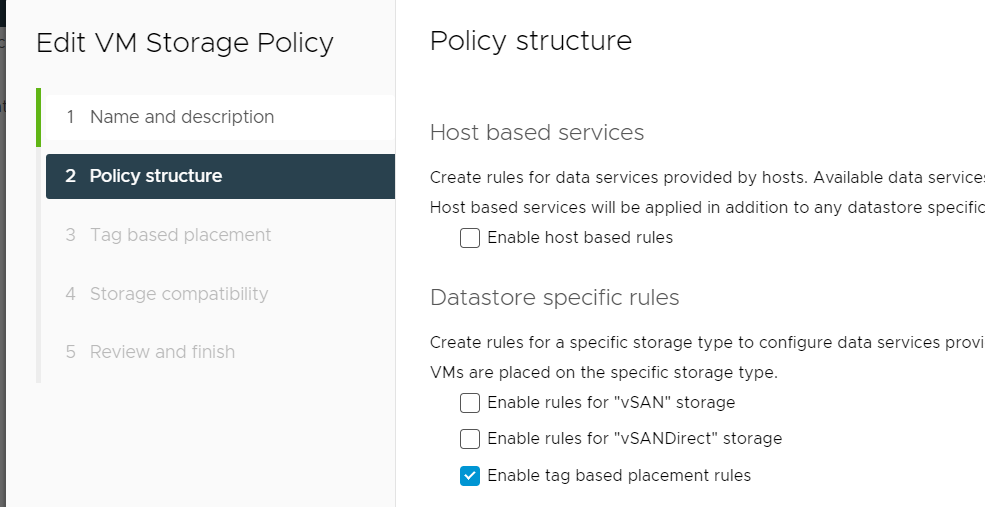
- Apply the correct settings based on the tag you created.
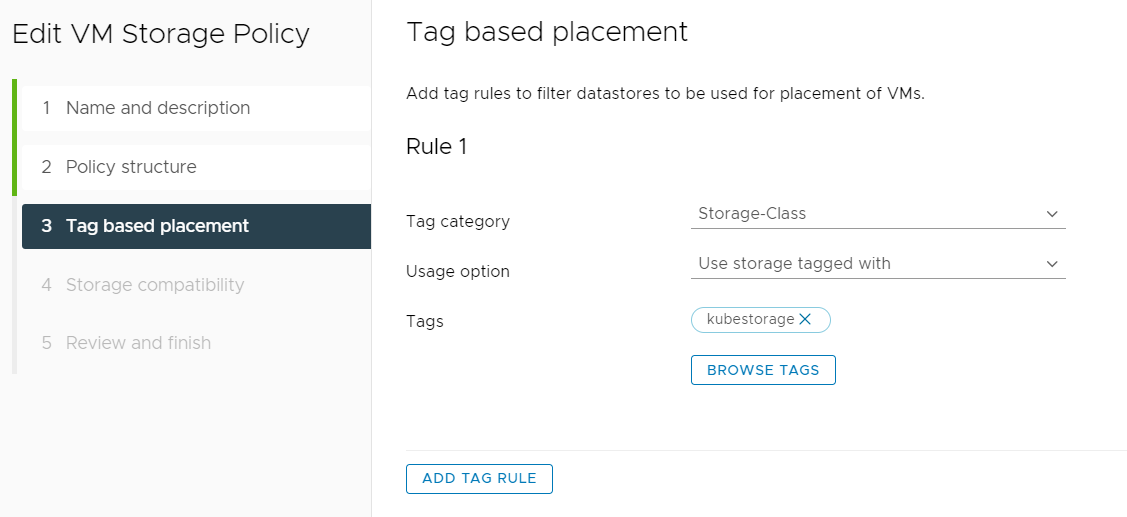
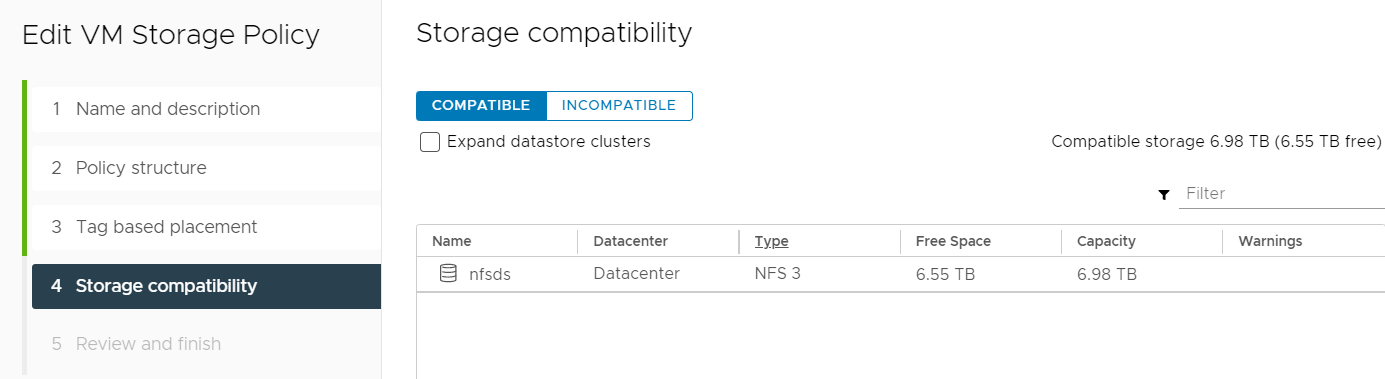
- Confirm that the datastores you want to use are listed.
- Confirm your settings and click finish to create the policy.
Install and configure the vSphere Cloud Provider Interface (CPI)
We will need to deploy the CPI, we can do this by shifting over to our Kubernetes cluster and following the documentation
First step is tainting the nodes, This is essentially an anti-affinity rule that we put on the host.
#run on master and worker nodes
kubectl taint node <node-name> node.cloudprovider.kubernetes.io/uninitialized=true:NoSchedule
Next, we will create the vsphere.conf
tee /etc/kubernetes/vsphere.conf >/dev/null <<EOF
# Global properties in this section will be used for all specified vCenters unless overriden in VirtualCenter section.
global:
port: 443
# set insecureFlag to true if the vCenter uses a self-signed cert
insecureFlag: true
# settings for using k8s
secret secretName: cpi-global-secret
secretNamespace: kube-system
# vcenter section
vcenter:
tenant-finance: server: 1.1.1.1 datacenters: – finanace tenant-hr: server: 192.168.0.1 datacenters: – hrwest – hreast tenant-engineering: server: 10.0.0.1 datacenters: – engineering secretName: cpi-engineering-secret secretNamespace: kube-system # labels for regions and zones labels: region: k8s-region zone: k8s-zone EOF” data-type=”internal” data-id=”#tee /etc/kubernetes/vsphere.conf >/dev/null <CPI Secret, this will store your vCenter credentials safely and will be used by the cluster to communicate to the vCenter.
#create yaml file
sudo vi cpi-global-secret.yaml

#username and password per vCenter (could also be fqdn rath than IP)
#uncomment if you have multiple VCs
apiVersion: v1
kind: Secret
metadata:
  name: cpi-global-secret
  namespace: kube-system
stringData:
  1.1.1.1.username: "[email protected]"
  1.1.1.1.password: "password"
  #192.168.0.1.username: "[email protected]"
  #192.168.0.1.password: "password"

#apply yaml file
kubectl create -f cpi-global-secret.yaml
Next, we will need to create the CPI configMap by creating the below .conf file using the parameters that match our vCenter. You can also see that we specify the secret to use in this config.
# tee /etc/kubernetes/vsphere.conf >/dev/null <<EOF

# Global properties in this section will be used for all specified vCenters unless overriden in VirtualCenter section.
global:
  port: 443
  # set insecureFlag to true if the vCenter uses a self-signed cert
  insecureFlag: true
  # settings for using k8s secret
  secretName: cpi-global-secret
  secretNamespace: kube-system

# vcenter section
vcenter:
  tenant-finance:
    server: 1.1.1.1
    datacenters:
      - finanace
EOF

# change folders
cd /etc/kubernetes

#create configmap
kubectl create configmap cloud-config --from-file=vsphere.conf --namespace=kube-system

#verify that it was created
kubectl get configmap cloud-config --namespace=kube-system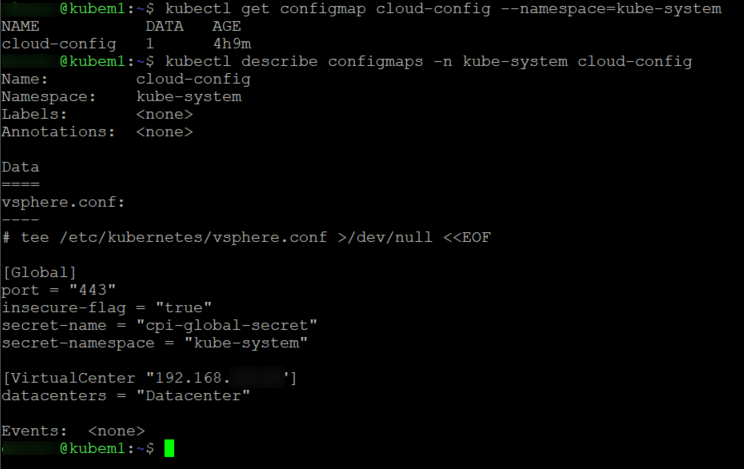
We have the secret in place and we have the config map set with our vCenter’s parameters. Now to deploy the CPI manifests
kubectl apply -f https://raw.githubusercontent.com/kubernetes/cloud-provider-vsphere/master/manifests/controller-manager/cloud-controller-manager-roles.yaml

kubectl apply -f https://raw.githubusercontent.com/kubernetes/cloud-provider-vsphere/master/manifests/controller-manager/cloud-controller-manager-role-bindings.yaml

kubectl apply -f https://github.com/kubernetes/cloud-provider-vsphere/raw/master/manifests/controller-manager/vsphere-cloud-controller-manager-ds.yaml
We can verify that its been completed successfully by running kubectl get pods –namespace=kube-system to make sure all the pods have started.
Side note, I actually messed this up the first time and had to go log diving in the pod to see what was going on. The pod went into a CrashLoopBackOff loop and wasn’t starting.
Turns out I typed the password in wrong in my secret file but hey this is how we learn 🙂
Running kubectl -n kube-system logs pod/vsphere-csi-controller-5f66cc9f7b-j9wbv vsphere-csi-controller showed me a whole stack of logs but the main one was time=”2021-05-04T01:17:44Z” level=fatal msg=”grpc failed” error=”ServerFaultCode: Cannot complete login due to an incorrect user name or password“.
Right, now that we got all the pods up and running and our password is actually correct we can check to make sure the taints have been removed as well as confirm all our nodes have a providerID.
#output should show NONE
kubectl describe nodes | egrep "Taints:|Name:"
# Grep for ProviderID
kubectl describe nodes | grep "ProviderID"
Install vSphere CSI Driver
Now that the CPI is installed we can shift our focus to the CSI driver.
First up we need to taint the master node again by running the below command
kubectl taint nodes <k8s-master-name> node-role.kubernetes.io/master=:NoScheduleNext up we need to create a csi-vsphere.conf file, you can find an example of the file and more information on each parameter here but it should look something like this when you done.
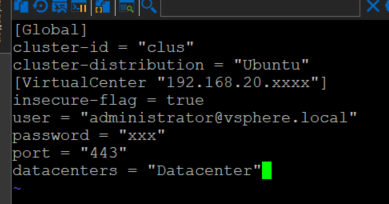
#sudo vi /etc/kubernetes/csi-vsphere.conf

[Global]
cluster-id = "<cluster-id>"
cluster-distribution = "<cluster-distribution>"
ca-file = <ca file path> # optional, use with insecure-flag set to false
thumbprint = "<cert thumbprint>" # optional, use with insecure-flag set to false without providing ca-file

[VirtualCenter "<IP or FQDN>"]
insecure-flag = "<true or false>"
user = "<username>"
password = "<password>"
port = "<port>"
datacenters = "<datacenter1-path>, <datacenter2-path>, ..."
Now we create a secret using the csi-vsphere.conf file we just created.
kubectl create secret generic vsphere-config-secret --from-file=csi-vsphere.conf --namespace=kube-systemAlmost there. Now we can finally install the CSI driver by running the following commands outlined in the documentation. I will be installing the latest version which at the time of writing is V2.2.0
- Create the required roles
kubectl apply -f https://raw.githubusercontent.com/kubernetes-sigs/vsphere-csi-driver/v2.2.0/manifests/v2.2.0/rbac/vsphere-csi-controller-rbac.yaml

kubectl apply -f https://raw.githubusercontent.com/kubernetes-sigs/vsphere-csi-driver/v2.2.0/manifests/v2.2.0/rbac/vsphere-csi-node-rbac.yaml- Deploy the CSI controller and daemonsets
kubectl apply -f https://raw.githubusercontent.com/kubernetes-sigs/vsphere-csi-driver/v2.2.0/manifests/v2.2.0/deploy/vsphere-csi-controller-deployment.yaml
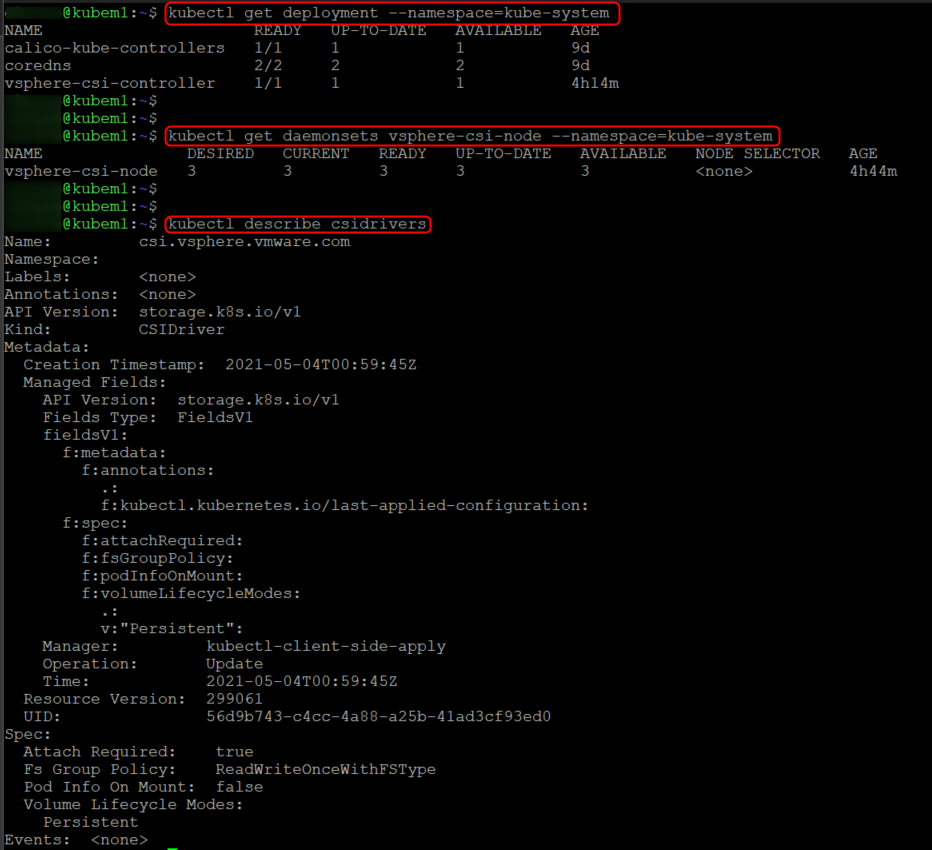
kubectl apply -f https://raw.githubusercontent.com/kubernetes-sigs/vsphere-csi-driver/v2.2.0/manifests/v2.2.0/deploy/vsphere-csi-node-ds.yamlWe can verify that its been deployed successfully by describing the deployment as well as the daemonsets, hopefully the output should look like the below.
Create a new storage class for dynamic provisioning
Dynamic provisioning allows the storage volumes to be created on-demand and when needed rather than requiring manual intervention, we do this by creating a storage class and marking it as default just like we did with the NFS storage class in my previous post.
Use the yaml example here and modify it to suit your environment, in my case it looked like the below, the important bits here are the parameters which need to line up with your environment.
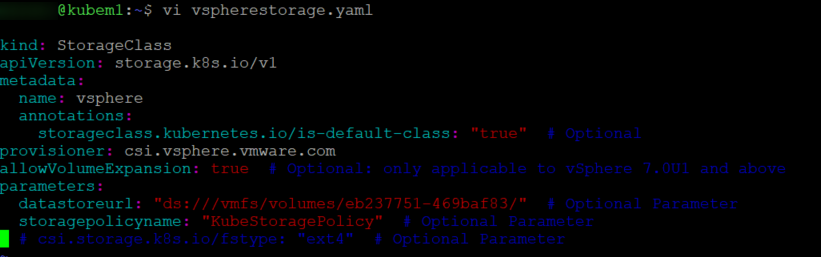
Once you have created the file and you are happy with the content you can create the storage class by running kubectl apply -f filename.yaml

Create a persistent volume that is visible in vSphere
Final step is to create a Persistent Volume Claim (PVC) which you can do by using this YAML file.
apiVersion: v1
kind: PersistentVolumeClaim
metadata:
  name: example-vanilla-block-pvc
spec:
  accessModes:
    - ReadWriteOnce
  resources:
    requests:
      storage: 5Gi
  storageClassName: example-vanilla-block-sc
This will create the PVC and also automatically provision a 5GB volume which we can see by describing the PVC.
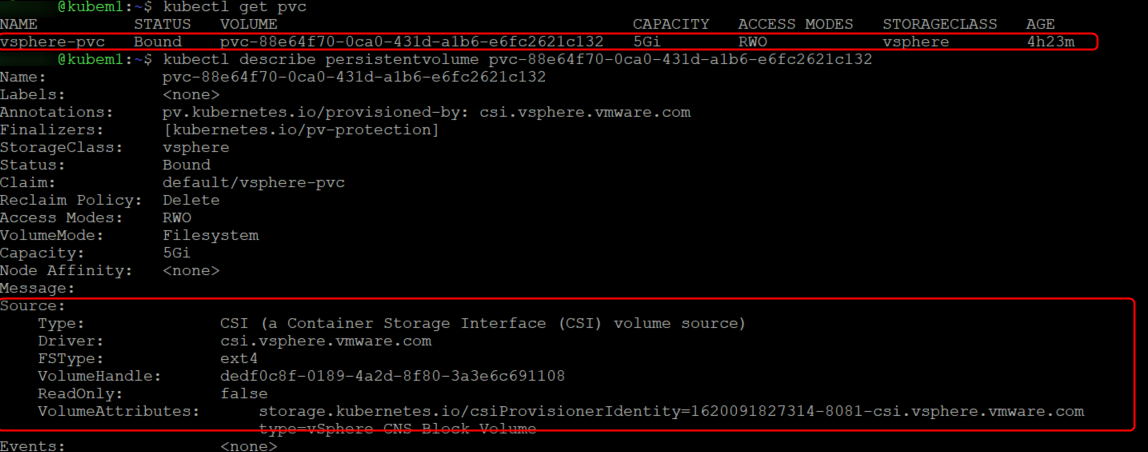
If we did everything correctly we should now be able to see the volume in vCenter.

I hope this was as much fun to read as it was to set up, I can’t begin to describe the value of just getting your hands dirty and doing something, there isn’t a better way to learn and with such amazing documentation it makes it even easier.
Honestly some of the documentation I have seen since starting this journey has just been phenomenal so thank you to the creators, you are making this journey slightly easier 🙂
Hope you enjoyed the content and as always never stop learning.