The Kubernetes Journey – Setup
// Table of Contents
Looking at how IT is changing it is undeniable that containers has become the latest hot topic and rightfully so, arguably becoming the next step in the virtualization lifecycle, Not that it should be viewed as a replacement for VMs, in fact i think we will be seeing containers and VMs living side by side for a long time as they both provide a function.
I have been in the virtualization game for some time now and with the rise in interest in Kubernetes and containers I decided its about time I learn what its about. Coming from a mainly infrastructure/Ops background, containers felt like a foreign world and I had no idea how to get started and honestly it felt a bit impossible to get involved in this Dev focused world, it was only once a friend Michael Cade started his K8s Learning Curve that I gained some sort of idea and direction and thanks to that I would like to share some things I’ve learnt regarding setting up a lab at home.
I’ll list the online training I have done which helped me out heaps to get this setup, I highly recommend that you dont just follow a blog post to get it setup but actually follow along the training as they go through it, in saying that I’m sure this blog series will contain some errors/issues as I am learning as I go so please feel free to reach out to me and lets chat, we are all learning together!
Getting Started with Docker Docker Deep Dive Docker & Kubernetes: The Big Picture Getting Started with Kubernetes JustmeandOpensource Youtube Channel Kubernetes Installation and Configuration Fundamentals
Lab Environment
Below details out the lab environment VMware 6.5u3 3x Ubuntu 20.04.2 LTS – 1 Master and 2 Workers Synology NAS – Used for NFS Storage
| Name | IP | Role |
|---|---|---|
| KubeM1 | 192.168.20.40 | Master |
| KubeW1 | 192.168.20.41 | Master |
| KubeW2 | 192.168.20.42 | Master |
I wont go through the entire build process of the Ubuntu servers but there are some requirements that you need to keep in mind.
- SCSI controller must be “VMware Paravirtual” on both the Master Node and Worker Nodes
- Set the Configuration Parameter called “disk.EnableUUID” to a TRUE
- This allows for a consistent UUID across reboots etc allowing for proper mounts.
Overview
Awesome, now that we have our base builds done and Ubuntu installed on all our VMs we can crack on with the Kubernetes install. There are three things from my learning that make up a Kubernetes cluster and its probably what confused me the most because there is a lot of info out there but nothing really pointing you in the right direction.
- CNI - Container Network Interface
- CSI - Container Storage Interface
- Container Runtime - Software responsible for running containers
From the training and documentation I was using I decided to use Calico as my CNI and NFS as my CSI as well as ContainerD for my runtime but there are multiple other options to suit your needs.
Deployment
Right, so we have our three ubuntu servers ready to roll, Lets ssh into the Master node and get started. First up we will need to install our container runtime in this case containerd, we start off by disabling swap and then following the Kubernetes documentation to install the runtime on all our nodes.
#Disable swap
swapoff -a
vi /etc/fstab

#containerd prereqs
cat <<EOF | sudo tee /etc/modules-load.d/containerd.conf
overlay
br_netfilter
EOF

sudo modprobe overlay
sudo modprobe br_netfilter

# Setup required sysctl params, these persist across reboots.
cat <<EOF | sudo tee /etc/sysctl.d/99-kubernetes-cri.conf
net.bridge.bridge-nf-call-iptables  = 1
net.ipv4.ip_forward                 = 1
net.bridge.bridge-nf-call-ip6tables = 1
EOF

# Apply sysctl params without reboot
sudo sysctl --system

#Install containerd
sudo apt-get update
sudo apt-get install -y containerd

#configure containerd
sudo mkdir -p /etc/containerd
containerd config default | sudo tee /etc/containerd/config.toml

#edit config.toml
sudo vi /etc/containerd/config.toml
#Find the line
"[plugins."io.containerd.grpc.v1.cri".containerd.runtimes.runc]#
#Add the below lines underneath keeping the indents     [plugins."io.containerd.grpc.v1.cri".containerd.runtimes.runc.options]
            SystemdCgroup = true
#Save and quit
#Restart containerd
sudo systemctl restart containerd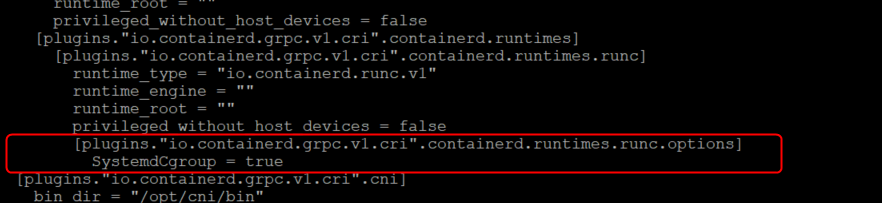
Deployment - Kubeadmin
Next on our list is to deploy Kubeadm, this is used to “bootstrap” our envrionment together and make it work. Again following the fantastic Kubernetes documentation we can do the following the download and install Kubeadm,Kubelet and Kubectl.
#Update and install packages
sudo apt-get update
sudo apt-get install -y apt-transport-https ca-certificates curl

#add Google Cloud Public Signing Key
sudo curl -fsSLo /usr/share/keyrings/kubernetes-archive-keyring.gpg https://packages.cloud.google.com/apt/doc/apt-key.gpg

Add Kubernetes apt Repo
echo "deb [signed-by=/usr/share/keyrings/kubernetes-archive-keyring.gpg] https://apt.kubernetes.io/ kubernetes-xenial main" | sudo tee /etc/apt/sources.list.d/kubernetes.list

#Update and install packages
sudo apt-get update
sudo apt-get install -y kubelet kubeadm kubectl

#Hold packages to stop apt from updating them
sudo apt-mark hold kubelet kubeadm kubectl
Installing Calico
Next up is to deploy our CNI, Again there are a lot of different flavors to choose from and you can use whatever works for you, because the training I was following used Calico, I opt’d to do the same for ease of learning.
The next few steps we only perform on the master node in my case KubeM1.
#download the calico yaml file
curl https://docs.projectcalico.org/manifests/calico.yaml -O

#depending on your container network you may need to edit the file #otherwise leave as defaults
vi calico.yaml

#look for "CALICO_IPV4POOL_CIDR"
uncomment both lines and set the CIDR to your preferred range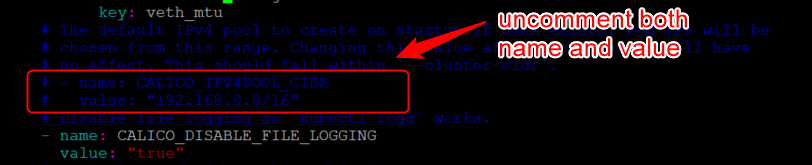
Deployment – Installing Kubernetes Control Plane
Crazy to believe all of the above has only been the ground work, so just to re-cap.
- We have disabled swap on all our nodes
- We have configured sysctl parameters on all our nodes
- We have installed containerd,kubectl,kubeadm and kubelet on all our nodes
- We have downloaded and modified the calico.yaml file to suit our environment on our master node
Ever hear the saying “Drinking from the fire hose?” pretty accurate to how I feel at this point…now to actually install Kubernetes, the part we have all been waiting for..
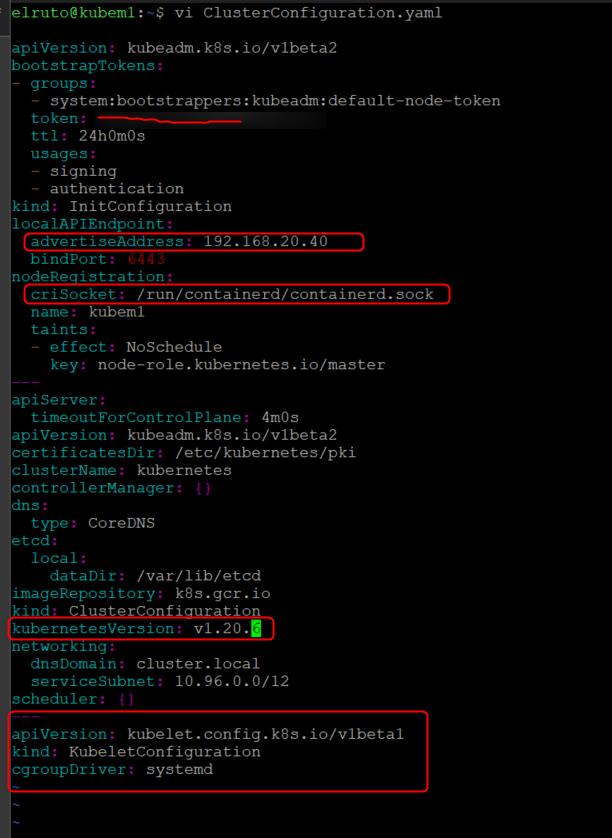
We will be using a config file here to define some parameters that we wish to feed into kubeadm init, to do so we need to generate a config file by running the following command.
kubeadm config print init-defaults | tee ClusterConfiguration.yamlThis will generate a yaml file with default information ready for us to modify, there are a few things we need to change in this document
- Change the “advertiseAddress” to the IP of your Master Node
- Change the criSocket to your container runtime (We used containerd so copy the line from the link)
- Make sure the version is the version you installed (use kubectl version to check)
- Add in the cgroupDriver config (from V1.21 adding the cgroup driver is no longer needed as it will default to systemd)
Now run kubeadm init to initialize your kubernetes control plane for the first time 🙂
sudo kubeadm init \
    --config=ClusterConfiguration.yaml \
    --cri-socket /run/containerd/containerd.sock
This will generate a whole heap of information about the process and hopefully right at the end we should see Your Kubernetes control-plane has initialized successfully! , if we see that then we are good to go.

Another thing to take note of here is the node joining token, this is how you connect your worker nodes to the Master node (Don’t worry if you forgot to copy it, it can be re-generated here.
Finally, To make kubectl work for your non-root user, run these commands as the user you wish to use.
mkdir -p $HOME/.kube
sudo cp -i /etc/kubernetes/admin.conf $HOME/.kube/config
sudo chown $(id -u):$(id -g) $HOME/.kube/config
Once that’s done, we need to apply the calico.yaml file we created earlier on by running.
kubectl apply -f calico.yamlThat’s it, you now have a functioning control plane! Now all we need to do is add some workers…
Deployment – Adding Worker Nodes
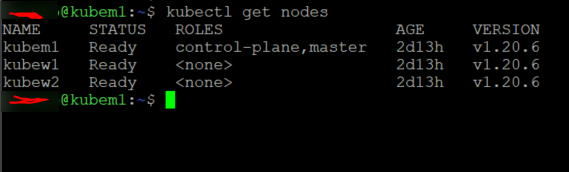
Using the joining token, we can join worker nodes to the cluster.
sudo kubeadm join <control-plane-host>:<control-plane-port> --token <token> --discovery-token-ca-cert-hash sha256:<hash>If we run the command kubectl get nodes on the Master now we should see our three servers listed (worker nodes roles are shown as none, expected behavior)
There you have it folks, a functioning kubernetes cluster for all your homelabbing fun. I hope this has been helpful as I know first hand how daunting this process can be having messed it up a few times.